

Squish your stress away
Stress relief, while seemingly a new development in the field of mental self-help, actually originates around the time of the conceptualization with the fight or flight mechanic. Developed by American psychologist Walter Brandon Cannon, stress initially encompasses external factors like temperature and surgical activity from the perspective of animals, Cannon extrapolated his findings into human terms from physical to internal stress, in his book 1932 book The Wisdom of the Human Body.
November 7, 2018
Stress: it affects us all. Granted, what exactly stresses one out varies from person to person. The effects of stress on the body remain largely uniform and extremely worrisome: increased rates of depression, heart attacks and stomach aches, lowered immune systems, and heightened blood pressure. Naturally, as many would want to avoid this manner of tension in their lives, stress relievers exist to aid in this process: these can vary from something minor and simple, like journaling personal thoughts, or it could comprise more intricate and costly efforts, such as the usage of biofeedback.
Many of these methods, however, can prove themselves too time consuming or taxing upon personal resources for effectiveness. As a result, Do It Yourself (DIY) variants of conventional stress relievers have emerged on the scene, and while the DIY subculture always existed prominently, best exemplified by its presence in the scientific, music, and fashion communities, stress relievers always seemed among the more popular homemade projects.
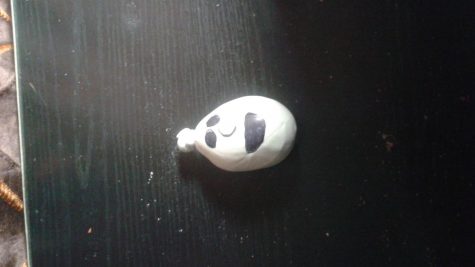
When finished, the balloon could possibly look like this; note, however, that the width of this balloon does not match its width in the original video. Materials: an empty water bottle, 1 cup (give or take, depending on personal preference regarding malleability) of all purpose flour, a miniature balloon, and a black Sharpie (optional).
Stress Ball (Tech Guy): Among the more commonly used stress relievers, the stress ball relieves physical tension. When squeezed in the hand, the ball relieves stress and tension of muscles within the user. The steps include:
- Fill up an empty water bottle with ½ cup of flour.
- Find a miniature balloon and put the bead on top of the bottle, then squeeze the flour out of the bottle into the balloon.
- Let any air or excess flour fall out, then tie up the balloon and squeeze the balloon to test for malleability.
- If desired, draw on the ball with a Sharpie.
The process of creating the ball lacked difficulty—it came off as rather easy, actually. One issue that did arise, however, regarded the malleability, or lack thereof, of the ball: for whatever reason, the balloon never “poofed” back in the way a conventional stress ball tends to. Instead, when squeezed, it would remain in the post-squeeze position. Despite this, the balloon could easily revert back to its pre-squeeze form, so long as one applies pressure slightly at the front and back. As for stress relief, it does so effectively, but not due to the clutching. That lack of malleability does hinder the point of a stress ball. The balloon also bounces off walls surprisingly well. On a scale of 1-10, this version of the Stress Ball would earn a 7.
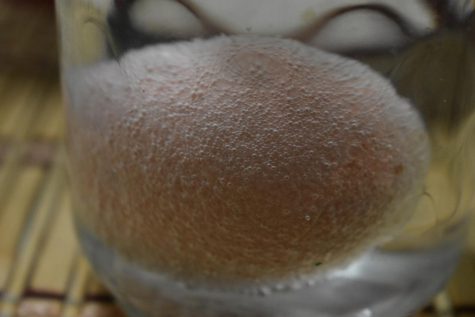
After about an hour or two in the vinegar, some bubbles should cling closely on top of the egg; this indicates that the outer shell began the process of dissolving. Materials: 1 egg (white or brown), a cup of white vinegar, water, and a bowl large enough to hold the egg in.
Bouncing Egg Ball (5 Minutes Crafts for Kids): This project essentially produces the same tool as the first one; however, instead of creating the ball from scratch, this one involves making the ball from an egg. The specific type of egg for this craft does not impact the final result.
- Fill a glass, preferably an old fashioned, brandy snifter, or any variation of rocks glass, halfway with vinegar; white distilled vinegar was used for this project.
- Put an egg into the glass, watch for bubbling on the surface of the egg.
- Let the glass, with the egg, sit for approximately 12 hours in either a fridge or any environment at room temperature.
- Remove the egg from the glass and place it inside a container of water to rinse off the dissolved shell: for white eggs, the yellow of the yolk should end up visible. For brown eggs, the white should show.
- Squeeze and test the egg to see how well it bounces, if at all.
Nothing in the process of creating this reliever created a hassle: all the steps saw themselves executed as per the video, and the end result came out fine. Note, though, that the egg breaks easily, as it can only endure about 10-15 bounces before the yolk inside leaks out. While that lowers the stress relieving qualities of it, those 10-15 bounces do feel nice enough. The egg ball earns an 8.
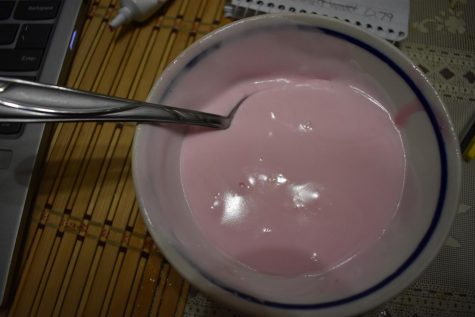
A picture of what the slime should look like just before putting in the shaving cream. The necessary materials include: 1 bottle of clear liquid glue (Elmer’s used here), red food coloring (this specific version used red gel food coloring instead of droplets), shaving cream, and a spoon to mix.
Slime (5 Minute Crafts for Kids): Slime seems like a hot commodity among children, most notably in anything Nickelodeon-related and toys for children. However, studies show that slime, in admittedly low amounts, can aid in lowering stress.
- Pour clear liquid glue into any miniature container. Put enough to cover the inner bottom portion.
- Add in five drops of red food coloring, then proceed to mix them together with a teaspoons.
- When the mixture turns deep red, spray in shaving cream and continue to mix.
- When the compound turns a bright red and nothing sticks to the bowl, remove and use.
This particular stress reliever produced the most difficulty in terms of replicating the video, specifically around steps three and four. The problem stemmed from the mixture never properly coming together into a slime form. All the other steps did take a decent amount of time to occur, with the blending and stirring, but upon researching the process of slime creation, the video used for inspiration lacked a substance to properly activate the process of turning the glue into slime, known as an activator. However, viewers in the comments section of the video stated that mixing for long enough periods of time would activate the slime. While this process lacked inherently stressful portions, the amount of time it took to make the slime became far too great to achieve the stress-relieving effects sought. The slime earns a rating of 6.
In all, these three projects worked out rather well. Though only the egg came out perfectly, the process of creating these stress relievers provided a nice, albeit fleeting, relief from the everyday stressors of life.